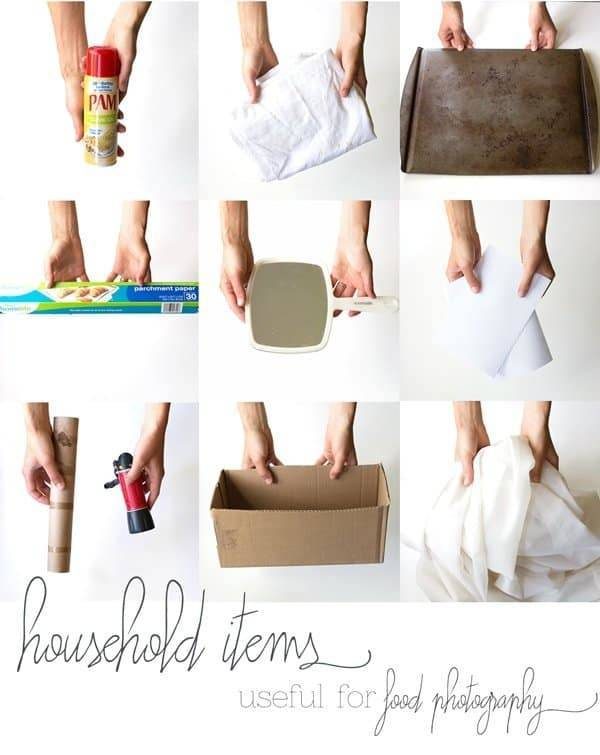
Today’s post is for the food photographers! I promise that POY won’t get overtaken by food photography stuff but lately I’ve been trying so many new (read: scrappy, easy, homemade) little things in my food photography and I’m just feeling compelled to share them. I firmly believe that you don’t need lots of fancy equipment to take great food photos. Just a few simple junk drawer tools can truly make your food pop off the page! POP.
#1: Nonstick Cooking Spray
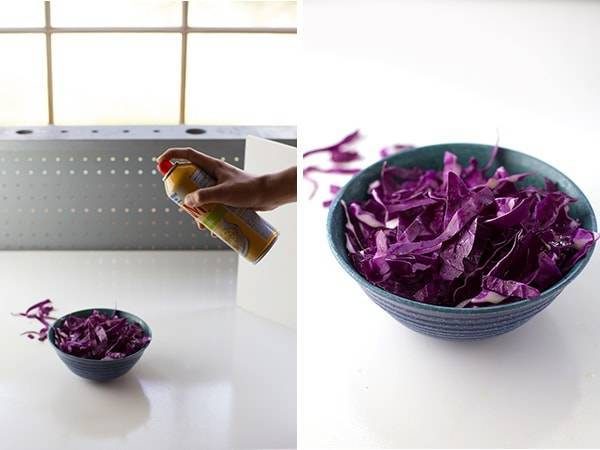
You know those times when you click on a link on Twitter and end up reading an article, probably crying, sending it to your mom and your second cousin, and then remembering that you were going to shoot that hot plate of spaghetti sitting in the kitchen? Woops. Nonstick cooking spray is going to come to the rescue on this one. I’ve used it to re-liven pastas, meat, lasagna, cheesy foods, and salads. Just one careful spray restores that glowy sheen and allows the food to catch the light a little bit better.
#2: White Flour Sack Towels
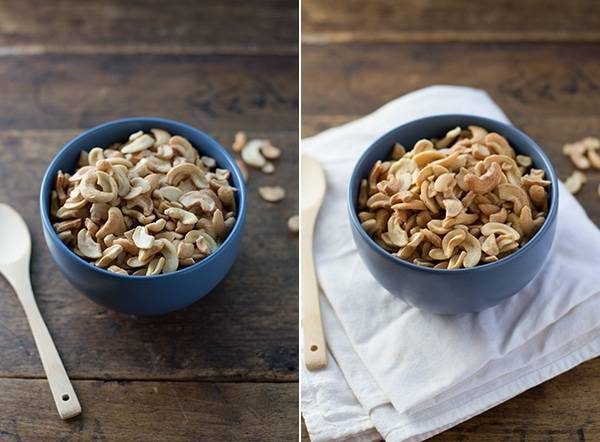
I’ve always liked using plain, white four sack towels right off my towel rack as a background textile in my food photos, but it wasn’t until I did this example that I truly realized how powerful that little white piece of cloth can be. Holy moly. I had to double check myself to make sure, and yes indeed, both of these photos had the EXACT same camera settings (SS 60, f/2.8, ISO 250) and I didn’t edit either of them at all. Nothing. Zippo. It’s possible that the lighting changed slightly in the one second between these two photos, but really, I’m shocked at how much of a difference that white towel makes for not only the composition, but even more so for the colors. If nothing else, having a white towel in your photos gives you a definite white point that you can use to accurately set your white balance in editing. Go white flour sack towels!
#3: Scratched, Stained Cookie Sheets
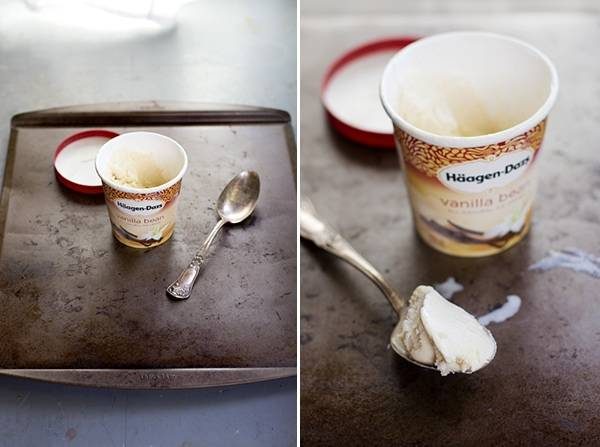
Take that outta the garage sale pile right now. That old, “ugly” cookie sheet is a treasured background to use for shooting food, and it doesn’t have to be just for cookie photos. I am consistently inspired by Naomi, the photographer and author of Baker’s Royale, and her frequent use of really creative textured backgrounds like cookie sheets or other dark, scratched surfaces. Here’s a yummy example.
#4: Parchment Paper
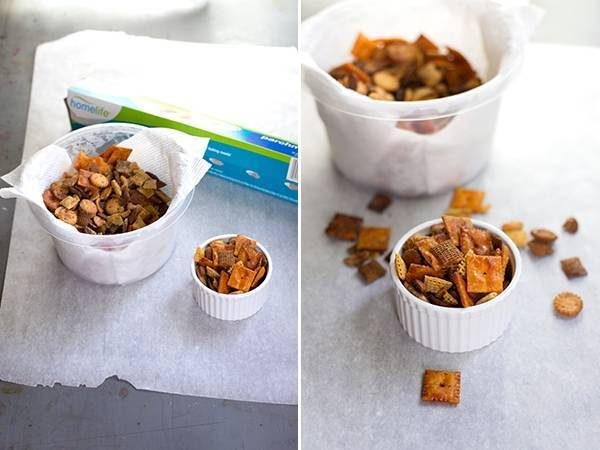
I don’t know what it is exactly about this stuff, but whenever I shoot with it I just love the texture that it gives the photo. It is transparent enough to tease you with the texture and color of whatever is behind it while still keeping the background of your food photos mostly clean and white. Sometimes I also cut up small pieces of parchment paper and use for individually cut dessert bars, like this.
#5: Hand Mirror
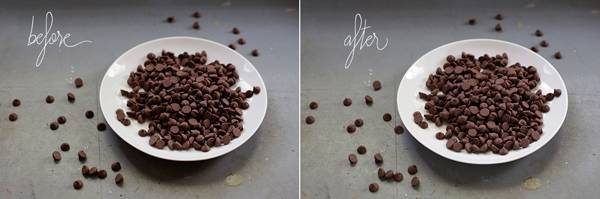
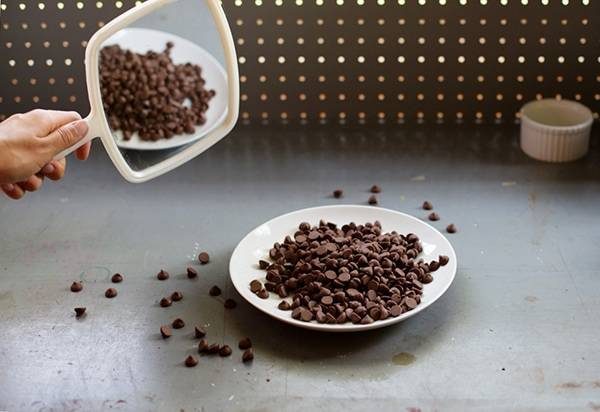
A hand mirror is a great way to bounce light around. It can be more a little bit more directed than your regular old reflector. Just hold your mirror across from the window, angle it down at the food, and you’ll be able to manipulate some highlights into a particular spot in the photograph.
#6: White Printer Paper
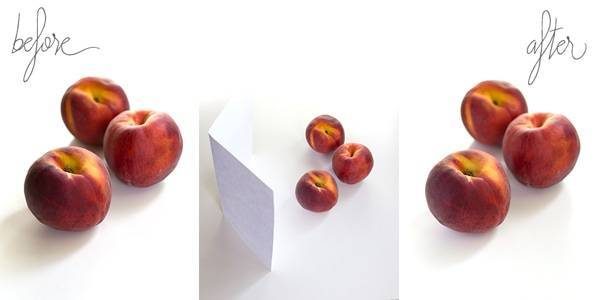
White printer paper is a powerful little reflector on the cheap. You can fold it, move it, and angle it however you want to get just the right spot of light under the plate or over the food. I typically end up folding the paper and letting it rest on the table so I don’t have to hold it, or I ask someone {thank you Bjork} to hold it over the food while I take a few shots.
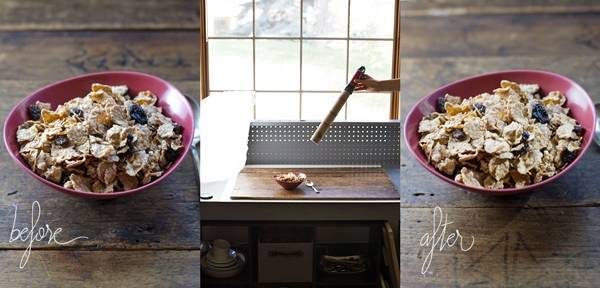
#7: Cardboard Paper Towel Roll (+ Flashlight)
If you don’t laugh when you’re holding this thing, you might not be alive. Apparently it’s called a snoot, and it’s a supergoofy looking little contraption made out of a flashlight with a paper towel roll taped to the end. The idea here is that it allows you to blast a little bit of concentrated light into a very specific spot. I actually just learned about this the other day when I was watching a video about photography, so I don’t have much experience using it, but I can imagine this being really useful when you want to create a photo that has a strong or dark vignetted look with stronger light right in the center.
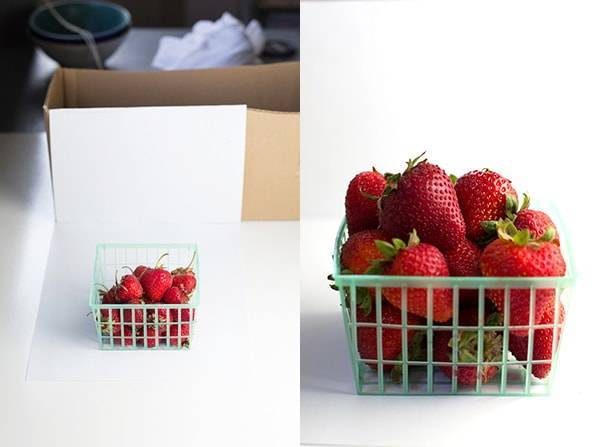
#8: Cardboard Shoe Box
Cardboard boxes can make for a quick and easy background when you have something awkward behind the food that’s making its way into your photo. Just cut the little flaps off the top and place the box with the open side up. Arrange your shot so that it leads naturally from your surface into your background space (er, the cardboard box). AND fold a white piece of paper over the edge of the box if you want to make a really pretty all-white background. I’d suggest putting a piece of paper under the food so that it matches background white exactly. I didn’t even have to edit the crease on the “horizon” because my low aperture just kinda blurred it out. Love it.
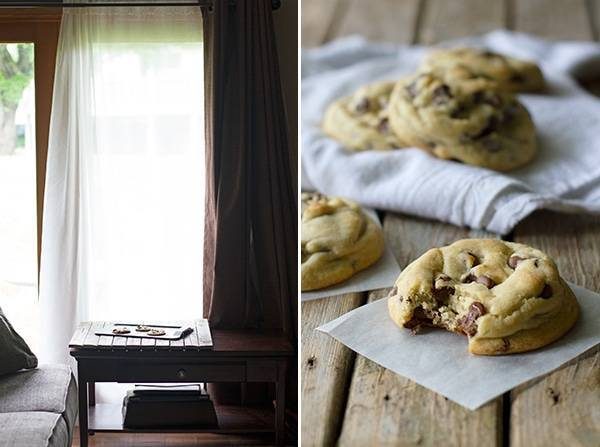
#9: Curtains
Sheer white curtains can be used to soften harsh light and create more of a soft glow. And it doesn’t really have to be curtains because any thin white cloth can serve this purpose – white sheets, thin white dish towels, etc. One time I even cut up an old pillowcase right down the seam so I could hang it up next to the window.
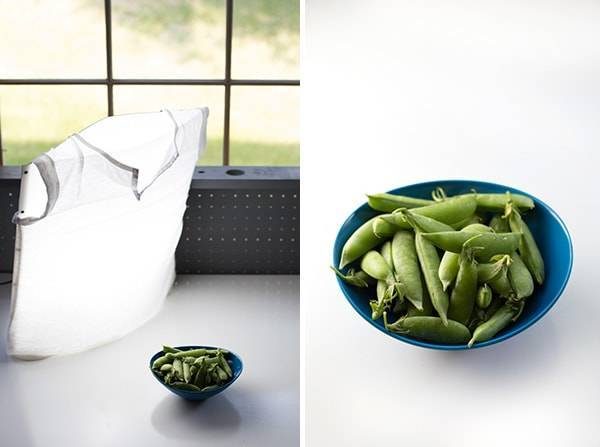
#10: White t-Shirt
And now I will creep you out with a human-looking lamp. I know, it’s so ridiculous. But if you are someone who has a photography lamp and uses it often, a t-shirt can be a great tool for softening what can otherwise be harsh artificial light. Just snuggle your (fitted) t-shirt over your lamp and you have a tightly fitting light filter that won’t slip off or hang awkwardly into your photo.
PS. I have never had a problem with starting my house on fire, but I guess this isn’t something you’d want to leave on all day and you proooobably want to make sure the fabric isn’t touching the actual lightbulb. Just sayin.
If you’re interested in learning more simple tips and tricks for taking better food photos, check out Tasty Food Photography, my ebook!
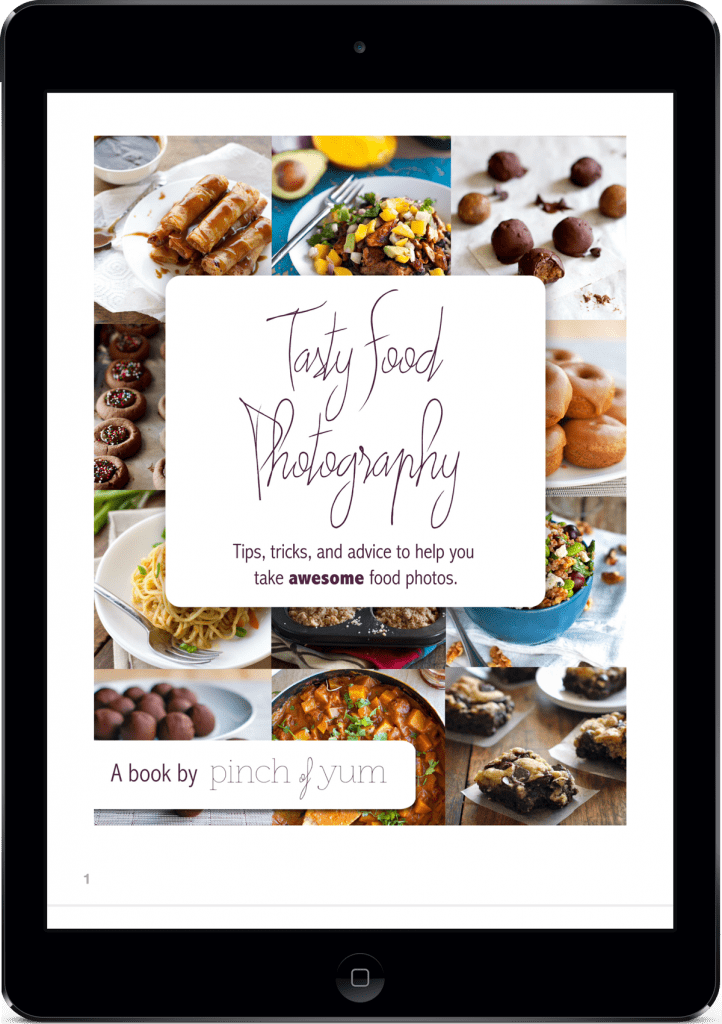

I just released an updated version that has more than 15 additional pages on lighting, smartphone photography, and creating emotions through food photography.


Thanks for sharing about these Household Items and amazing Ideas, super excited to apply these.
ahhaha Fail at 7:00
my blog post Treasure at Tampines Brochure
I’m really loving the theme/design of your blog. Do
you ever run into any browser compatibility problems?
A number of my blog visitors have complained about my blog
not operating correctly in Explorer but looks great in Safari.
Do you have any recommendations to help fix this issue?
Great tips! Thanks for sharing. Loved them all <3
Thanks for all these awesome tips! We’ll definitely be trying some of them out on GradFood 🙂
Great tips as always! Really hoping to make it to one of your workshops this year – you’re just three hours away! <3
You are a genius at coming up with these tricks. Many thanks.
Wonderful tips, love the rusty baking tray tip! As bloggers its not feasible to keep buying props!
gracias por tus consejos son excelentes los usare en mi nuevo blog pronto
apenas empiezo de 0 pero poco a poco lo voy creando
Hi Lindsay! Just wanted to say a great big Thank You! You’ve been incredibly helpful with the startup of my new food blog! Because of you I got my first three recipe submits accepted on foodgawker! You’
Hi! where did you get your light?
As a newbie to food blogging, your tips ARE AWESOME! So creative, I will definitely be following along!
I see you don’t monetize your website, don’t waste your traffic,
you can earn extra bucks every month because you’ve
got hi quality content. If you want to know how to make extra $$$, search for:
Boorfe’s tips best adsense alternative
Thank you so much
Thank you for this post! I’m new to blogging and food photography and this gave me some great ideas!
Wow! Thanks for this informational post… I’m hoping to use some of these for my blog 🙂
Such great ideas!! thanks you!
http://www.lygialimayoga.com.br/
What kind of photography lamp do you use?
Hi Cassandra! Lindsay uses a Lowel: https://www.amazon.com/gp/product/B0009K50RO/ref=as_li_ss_tl?ie=UTF8&linkCode=sl1&tag=pinchofyum-photography-20&linkId=2dc54cead8a260f468066f1f608cbee6
This is so inspiring, I think you just took my photography game up a big notch! I find myself at a loss sometimes for how to ‘beautify’ my finished dishes, but suddenly now I’m seeing possibility everywhere. Thank you so much!
I’m so happy to have stumbled upon this! Thank you so much for sharing your wealth of information with people who are just starting out! Your website is literally a godsend. These tips are so amazing, I can’t wait to start using them!!
Thank you sooo much, lovely tips and on the cheap ! love it ! 🙂
Amazing tips ,really helpful .Making awesome pics out ofhouse hold items.
Your every posts are awesome. I am a regular reader of your blog and love your every food post 🙂
Thank you very much for this great tips! You are both amazing. I’m just starting my blog and every time I don’t know how to do something, you have the answer! I really appreciate that you share all this useful information with us!
We’re happy to help! 🙂